

Building Your Abs (The Right Way)
7 Principles, 6 Exercises, & 3 Programs to Build the 3D Ab Look

If you want a core that has the thick, 3D look with visibly separated abs, you need to train your core the same way you train every other muscle:
Progressive overload.
Intelligent exercise selection.
Enough frequency to drive growth.
Today we cover exactly how to do that.

Contents:
Anatomy of the Core
7 Core Training Principles
Exercise Arsenal (Video Demonstrations)
3 Example Programs
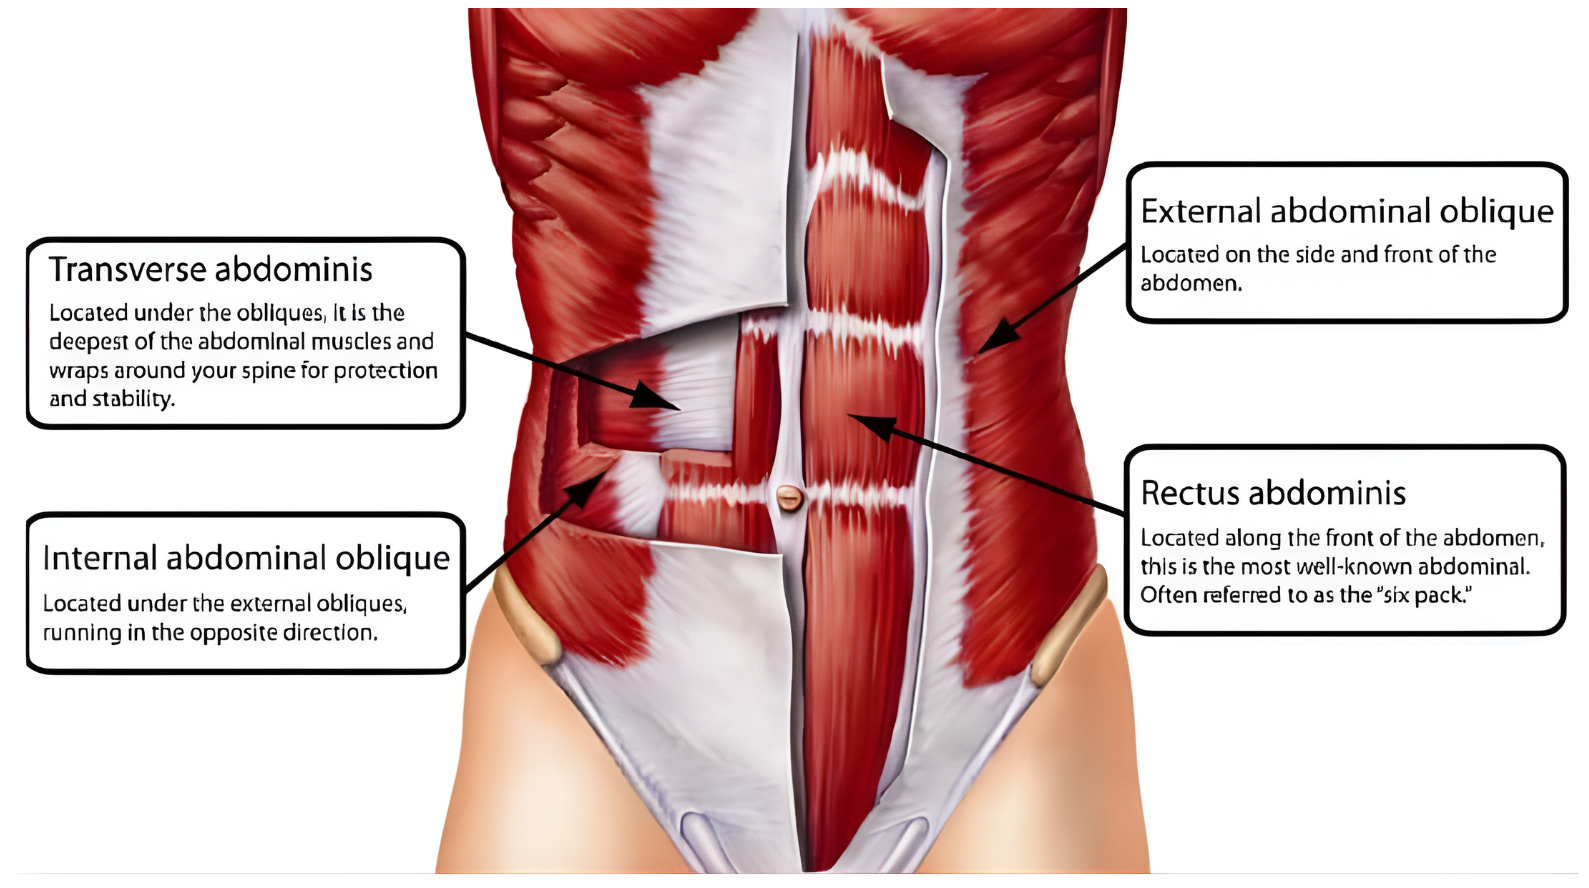
Anatomy of the Core
First let’s get some definitions down to help us later on:
Rectus abdominis (the six-pack) runs vertically from sternum to pelvis and its primary action is spinal flexion.
Transverse abdominis (TVA) wraps around your torso like a natural weight belt and is responsible for the tight, drawn-in waistline look.
Obliques run diagonally along the sides handling rotation, lateral flexion, & bracing.
The 7 Core Training Principles
1. Kitchen Reveals. Training Builds.
Two distinctly different functions. You can get lean enough to see your abs through diet alone, but if you haven’t built them with progressive resistance, you’ll end up having a pretty underwhelming core. The guys with abs that pop at 12% body fat are the ones hitting them hard in a hypercaloric/gaining state.
2. Thickness Is What Separates Good From Great
The difference between just visible abs and the 3D look is thickness. And thickness comes from the same place it comes from everywhere else on your body: adaptation via progressive overload. BW crunches and air bikes won’t build muscle any more than an air squat will build your quads or a band curl your bis.
3. Close the Gap: Spinal Flexion Over Hip Flexion
The most important mechanical principle about ab training. The true function of the abs is to shorten the distance between the pelvic basin and the sternum.
Full sit-ups & full leg raises aren’t primary ab movements since they shift the majority of the load to the hip flexors and psoas. It’s why we’ll prioritize exercises that isolate spinal flexion (curling the rib cage toward the pelvis) & pelvic tilting (curling the pelvis toward the rib cage).
Key point to remember: If you’re not “closing the gap” on each rep, you’re training your hip flexors, not your abs.
3. You Need Progressive Overload, They Need Weight to Grow
Weighted exercises like an ab machine or cable crunch with resistance produce significantly greater rectus abdominis activation compared to bodyweight-only movements.
To increase the size of the muscle, you need to progressively increase the stimulus. Add reps first. Once you hit the top of the rep range across all sets, add weight. Simple.
4. Train Them More Often Than You Think
The abdominals have a higher proportion of slow-twitch (Type I) muscle fibers —(~60%) and receive among the best blood supply of any muscle group in the body.
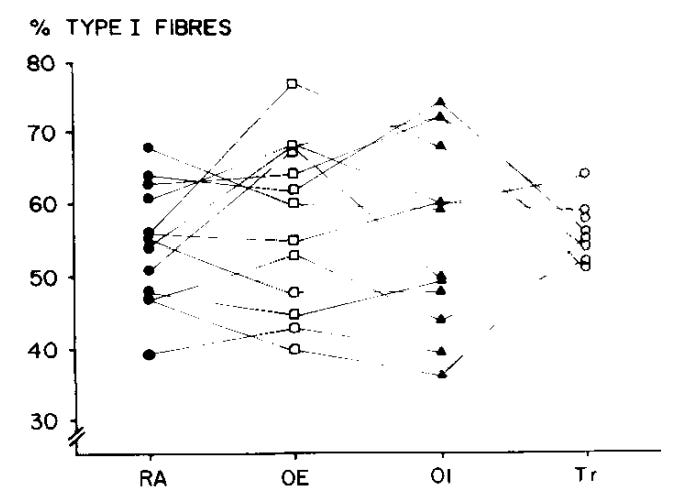
More slow-twitch fibers means less exercise-induced damage per session. Better blood supply means faster nutrient delivery, faster waste removal, & quicker recovery. They’re also relatively small muscles that function constantly as postural stabilizers.
All of this means the abs recover quickly and respond well to higher frequency training at 3—4x/week.
5. Genetics Determine Shape — Not Your Potential
Your ab shape (symmetrical, staggered, a six-pack or a four-pack) is genetically determined by the tendinous inscriptions of the rectus abdominis.
While most have three paired intersections, there’s bioindividual variation in thickness & depth through the muscle. Haque et al. (2015) found that 96% had three tendinous intersections (yielding a six-pack appearance), while a small minority had four or five.
Though you can’t control the offset & shape, you can control how thick, dense, & developed they become.
6. Abs Respond Fast (When Trained Properly)
Because of their fiber composition and blood supply, abs develop relatively quickly when you finally give them the right stimulus.
In The Wild Physique, Vince Gironda talks about the best abdominals he’d ever seen belonging to French-Canadian gym owner Leo Robert:
“he had chunky abdominal muscles from the bottom of his rib cage to well below the navel…perfectly aligned in three straight rows. He was the envy of every bodybuilder in his day.”

When Gironda himself finally committed to building his own core after neglecting it for years, he achieved “world-class abs in just six weeks.”
He swore by short, intense sessions with minimal rest. The abs don’t need much, but when you hit them with the right resistance & intensity, they’ll respond faster than almost any muscle on your body.
The Exercise Arsenal
Here are the 6 best movements for building a 3D core:
1. Ab Crunch Machine (Top Pick)
Machines lock you into a fixed path, making it nearly impossible to cheat with momentum or hip flexors. If your gym has a front-pad loaded machine (pad against your chest), even better since it forces pure spinal flexion.
Execution:
If chest padded — adjust the pad to chest height. Feet flat, grab handles lightly. Do NOT death-grip it and pull with your arms.
Initiate by exhaling hard and curling your rib cage down toward your pelvis. Embrace “close the gap” between sternum & belly button.
Squeeze hard at the bottom for 1–2 seconds. Return on a controlled eccentric.
Common Mistakes: Pulling with the arms, hinging at the hips instead of flexing the spine, going too heavy and losing the contraction.
Alternative: Cable crunch is the next best option (below).
2. Cable Crunch
Constant tension throughout the range of motion. Easy to progressively overload with small weight jumps.
Execution:
Kneel in front of a high pulley with a rope attachment. Hold the rope at the sides of your head (not behind your neck).
Keep your chest up. Flex your spine, curling rib cage toward pelvis. Hips stay stationary.
Squeeze at the bottom, exhale fully, return under control.
Common Mistakes: Sitting back into the hips (turns it into hip flexion), pulling with arms, rounding at the neck instead of thoracic spine.
3. Hanging Leg Raise
Excellent for the lower portion of the rectus abdominis. The hanging position also decompresses the spine.
Execution:
Hang from a pull-up bar, shoulder-width grip. Legs straight (or slightly bent for progression).
Allow your lower back to round — you want posterior pelvic tilt.
Drive knees up toward your chest, exhaling fully and forcefully as you curl up. Think about bringing your pelvis toward your rib cage.
Control the descent. Don’t swing. Pause & hold the stretch feel at the bottom to kill momentum before the next rep.
Common Mistakes: Swinging wildly, keeping the lower back arched (shifts load to hip flexors), stopping at 90° (leaves most of the ab work on the table).
Progression: Straight legs → weighted (dumbbell between feet) → toes to bar.
4. Ab Wheel Rollout
Anti-extension movement that hammers the entire rectus abdominis and TVA under serious eccentric loading. One of the best versatile movements you can do at home. You don’t need anything fancy — $14 on Amazon.
Execution:
Kneel on a pad, grip the ab wheel directly under your shoulders.
Brace hard. Tuck pelvis slightly (posterior pelvic tilt).
Roll forward slowly, extend arms overhead while keeping your core tight.
Go as far as you can control without hips sagging, then pull back by flexing your abs (not yanking with arms).
Common Mistakes: Letting the lower back hyperextend, using hip flexion to pull back, going too far too soon.
Progression: Half rollouts → full from knees → standing rollouts (advanced).
5. Decline Reverse Crunch
Targets the lower abs with greater range of motion than a flat reverse crunch. Decline angle adds resistance via gravity.
Execution:
Lie on a decline bench, head at top, hands gripping behind your head.
Bring knees toward chest by curling your pelvis up off the bench — not just the legs.
Squeeze at top, exhale fully, slowly lower. Keep constant tension — don’t let your lower back fully settle between reps.
Add a dumbbell between feet to progress.
Common Mistakes: Using momentum to swing legs, only moving legs without lifting pelvis, going too fast.
6. Stomach Vacuum
Targets the transverse abdominis — the deep stabilizer that cinches your waist tight. Golden-era bodybuilders swore by this for a narrow, controlled midsection.
Execution:
Stand upright, exhale all air from your lungs.
Draw your belly button in toward your spine as hard as possible — imagine trying to touch your belly button to your backbone.
Hold 15–30 seconds. Breathe shallowly through your chest if needed. Release and repeat.
2 different methods highlighted in the video below.
Three Protocols
In a gain phase, train abs 3–4x per week. In a cut phase, you can hit them 2—3x per week. Each session should take 10–15 minutes.
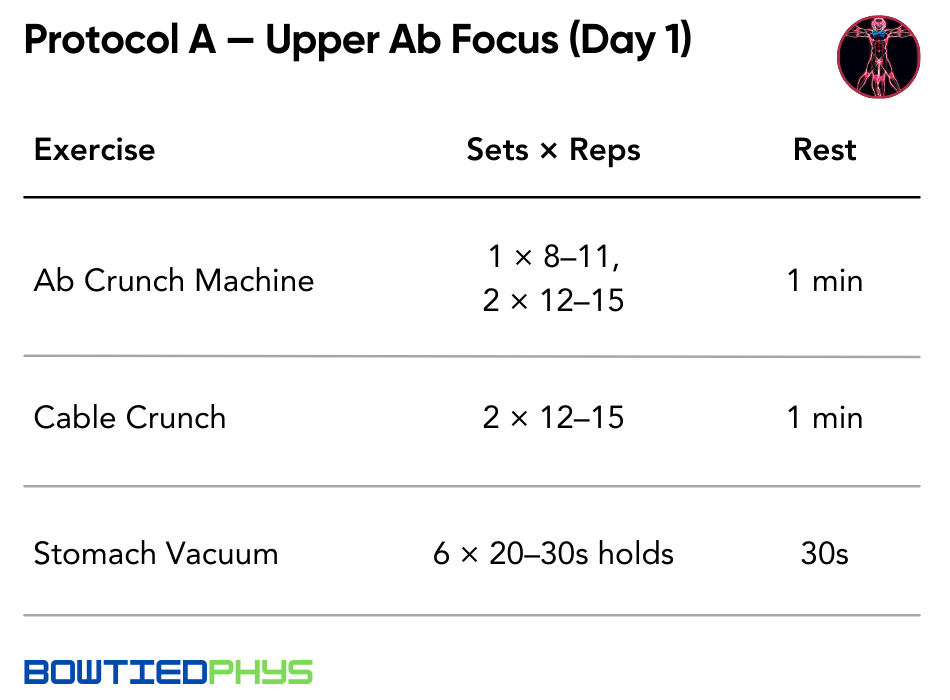
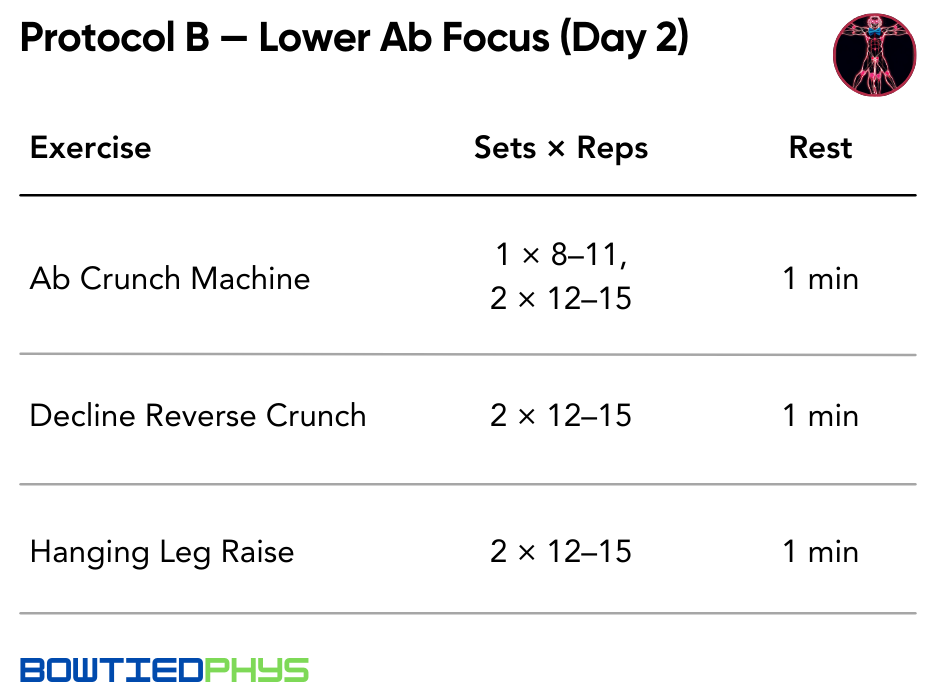
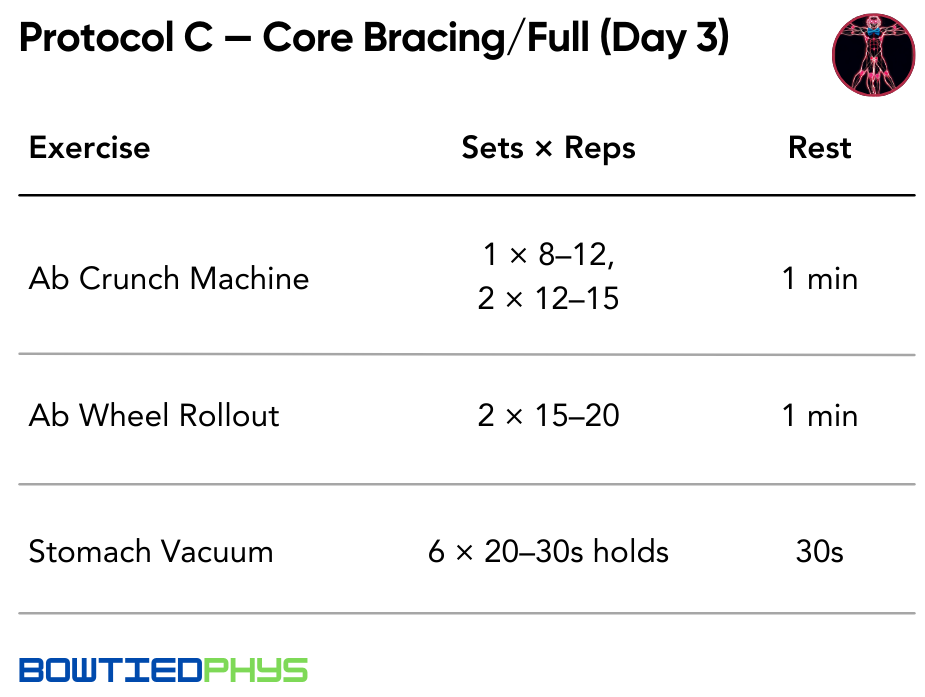
Progression strategy: Add reps first. Once you hit the top of the rep range (with elite form) across all sets, bump up the weight. It’s no different than progressing on other movements.
Time saving hacks: Get an ab wheel for at home use & conduct the stomach vacuums while working at a standing desk.
If there’s anything to take away here:
Stop treating your abs like they exist in a different physiological universe than the rest of your training. They need resistance. They need progressive overload. They need to be trained during a surplus when your body is best suited to build muscle.
Diet leans you out & reveals. Training properly builds. Do both & you’ll have an S-tier core.
Your friend,
Phys